
| Working with PrizmDoc > Developer Guide > PrizmDoc Server > How To > Watermark Content in a Viewing Session |
The PrizmDoc Backend RESTful Services supports Text, Diagonal Text and Image watermarks for a viewing session. This means that the viewable content that is displayed in the browser will contain the specified watermarks. The watermarks will not be applied to the source document.
 |
Specifying watermarks in a viewing session will disable cache reuse. This means that the process to convert a document to viewable content will be executed for each viewing session even if the source document is the same as one in an existing viewing session. See the topic Adjusting Caching Parameters for PrizmDoc Server for more information about cache reuse and the side-effects of disabling it. |
 |
Watermarks are currently fully supported only when viewing SVG content. When viewing watermarked raster content, multi-line text, text decoration, and complex Unicode fonts such as those used for Hebrew and Arabic are not supported. Watermarks using these options will not appear when viewing is performed in the Internet Explorer 8 browser, which does not support SVG. |
Watermarks are defined by setting additional JSON properties in the body of the HTTP request that you send to create a new Viewing Session. These properties are described in more detail in the Viewing Sessions topic under the POST ViewingSession request.
The watermark properties you set for the viewing session will be applied to all pages of the document. You can specify more than one watermark in a viewing session. You can also apply watermarks of mixed types. For example, a diagonal text watermark can be used to apply the text "Confidential" across each page and an image watermark can be added to apply your company logo to the top-right corner of each page.
The following sections describe special characteristics of text watermarks that warrant additional explanation.
The control character '\n' has a special meaning inside the text string of a text watermark. If present, a line break will be applied at its position.
| Example |
Copy Code
|
|---|---|
"text": "ACME Corporation\nConfidential" |
|
Use the special replacement syntax "{{pageNumber}}" and "{{pageCount}}" in the text string of a text watermark to display the current page number and/or page count on each page.
| Example |
Copy Code
|
|---|---|
"text": "Page {{pageNumber}} of {{pageCount}}" |
|
The "fontFamily" property can be used to specify a font for text watermarks.
When viewing SVG content, please be aware that text watermarks will be created using SVG that is rendered on the browser. This means that the font specified in this property must be available on the Viewing Client. When the "fontFamily" property is not set, the default font of the client browser executing the Viewing Client will be used to render text watermarks.
The following sections describe special characteristics of image watermarks that warrant additional explanation.
The source format of image watermarks must be PNG. Transparency options of a PNG will be honored so that transparent sections of the image will reveal the page content beneath it.
The source of image watermarks can be either a URL or work file ID.
The URL should specify an absolute location with a scheme of HTTP or HTTPS. Please be sure that the URL is accessible from the server where PrizmDoc Backend RESTful Services are running.
See the Work Files topic for more information about creating work files and getting their IDs.
Text and Image watermarks can be aligned with nine commonly used locations in a page. Diagonal Text can only be aligned in the center of the page.

You can select any one of these nine positions for Text and Image watermarks using two properties:
For example, to place a text watermark at the bottom-right corner of a page set horizontalAlign to right and verticalAlign to bottom.
 |
Setting the autoSize property for an Image watermark will override these alignment settings. |
The following examples demonstrate how to apply the various types of watermarks.
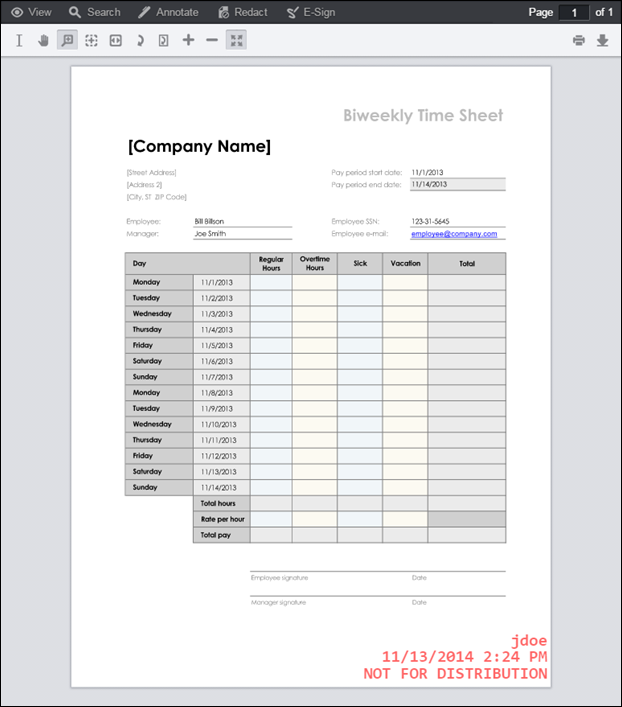
This example demonstrates how to apply a single text watermark. In the sample output, notice that the '\n' control character in the text string creates line breaks in the text.
| Example |
Copy Code
|
|---|---|
POST http://localhost:18681/PCCIS/V1/ViewingSession Content-Type: application/json { "tenantId": "my application name", "externalId": "my-unique-document-name.docx", "render": { "flash": { "optimizationLevel": 1 }, "html5": { "alwaysUseRaster": false } }, "watermarks": [ { "type": "text", "opacity": 0.6, "text": "jdoe\n67.79.169.114\n11/13/2014 2:24 PM\nNOT FOR DISTRIBUTION", "color": "red", "fontFamily": "Consolas", "fontSize": "16pt", "fontWeight": "bold", "verticalAlign": "bottom", "horizontalAlign": "right" } ] } |
|

This example demonstrates how to apply a single diagonal text watermark. Diagonal text watermarks can only be applied to the center of the page. In the sample output, the text "Accusoft\nConfidential" is displayed diagonally over the center of the page. Notice that the '\n' control character in the text string creates a line break in the text.
| Example |
Copy Code
|
|---|---|
POST http://localhost:18681/PCCIS/V1/ViewingSession Content-Type: application/json { "tenantId": "my application name", "externalId": "my-unique-document-name.docx", "render": { "flash": { "optimizationLevel": 1 }, "html5": { "alwaysUseRaster": false } }, "watermarks": [ { "type": "diagonalText", "slope" : "up", "opacity": 0.25, "text": "Accusoft\nConfidential", "fontSize": "50pt", "color": "#FF0000", "fontWeight": "bold", "fontFamily": "Arial" } ] } |
|

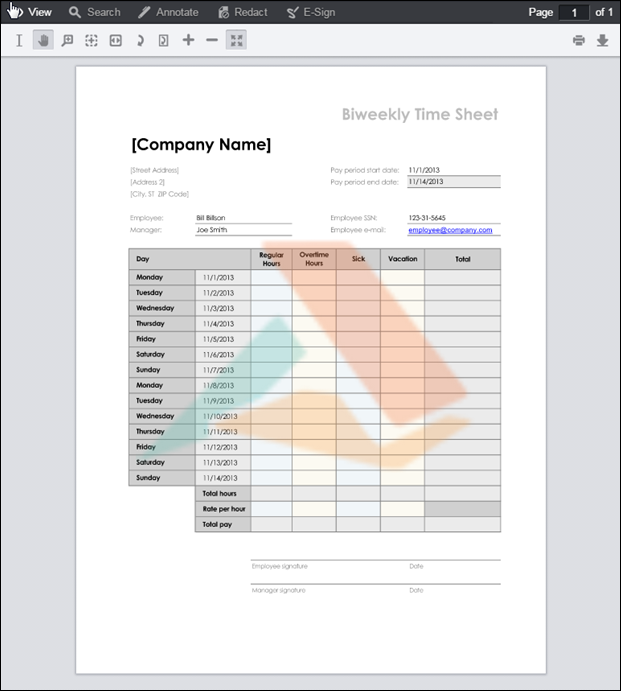
This example demonstrates how to apply a single image watermark over the entire page. In the sample output, the tri-color Accusoft logo spans the center of the page. Notice that the transparent areas of the PNG image source do not obstruct the page content beneath it.
| Example |
Copy Code
|
|---|---|
POST http://localhost:18681/PCCIS/V1/ViewingSession Content-Type: application/json { "tenantId": "my application name", "externalId": "my-unique-document-name.docx", "render": { "flash": { "optimizationLevel": 1 }, "html5": { "alwaysUseRaster": false } }, "watermarks": [ { "type": "image", "opacity": 0.3, "src": "http://localhost/watermark_images/logo.png", "autoSize": "fit" } ] } |
|

This example demonstrates how to apply multiple watermarks to a viewing session. In the sample output, the tri-color Accusoft logo spans the center of the page and the text watermark near the bottom-right corner displays information about the user.
| Example |
Copy Code
|
|---|---|
POST http://localhost:18681/PCCIS/V1/ViewingSession Content-Type: application/json { "tenantId": "my application name", "externalId": "my-unique-document-name.docx", "render": { "flash": { "optimizationLevel": 1 }, "html5": { "alwaysUseRaster": false } }, "watermarks": [ { "type": "text", "opacity": 0.6, "text": "jdoe\n67.79.169.114\n11/13/2014 2:24 PM\NOT FOR DISTRIBUTION", "color": "red", "fontFamily": "Consolas", "fontSize": "16pt", "fontWeight": "bold", "verticalAlign": "bottom", "horizontalAlign": "right" }, { "type": "image", "opacity": 0.3, "src": "http://localhost/watermark_images/logo.png", "autoSize": "fit" } ] } |
|
